Installation & update guide
Document Objective
The objective of this document is to guide the installation of the ApiShare product in “portable” mode on a Kubernetes cluster.
Product Requirements
Optimal
Namespace | CPU | RAM | Storage | Notes |
|---|---|---|---|---|
| 4 cores | 6 Gb | 16 Gb | Storage: RabbitMQ 3Gb (x 3 replicas) + 5Gb Postgres + 1Gb Elastic + 1Gb Keycloak |
| 10 cores | 20 Gb | 1 Gb | Storage: 1Gb webapp. All microservices are replicas=2 (scheduler management only 1 for versions <1.9.0) |
| 4 cores | 2 Gb | - | 3 replicas |
Total | 18 cores | 28 Gb | 17 Gb |
|
Minimum
Namespace | CPU | RAM | Storage | Notes |
|---|---|---|---|---|
| 0.5 cores | 3 Gb | 16 Gb | Storage: RabbitMQ 3Gb (x 3 replicas) + 5Gb Postgres + 1Gb Elastic + 1Gb Keycloak |
| 2 cores | 10 Gb | 1 Gb | Storage: 1Gb webapp. All microservices are replicas=2 (scheduler management only 1 for versions <1.9.0) |
| 0.5 cores | 2 Gb | - | 3 replicas |
Total | 3 cores | 15 Gb | 17 Gb |
|
Installation Prerequisites
The analysis and definition of both technical and business target configurations must have been previously completed with the ApiShare CS team. This information must be shared with the installation team. In particular, the target FQDN of the frontend will be required for executing the Redirect URIs Configuration step.
A Kubernetes cluster targeted for installation.
The following items provided by the ApiShare team:
Download link for the installation package of the target ApiShare release.
Pointers and credentials for the ApiShare Docker registry for product image delivery.
Access credentials to internal auxiliary components of the product.
A supporting Linux machine to extract the installation package and create the installation workspace.
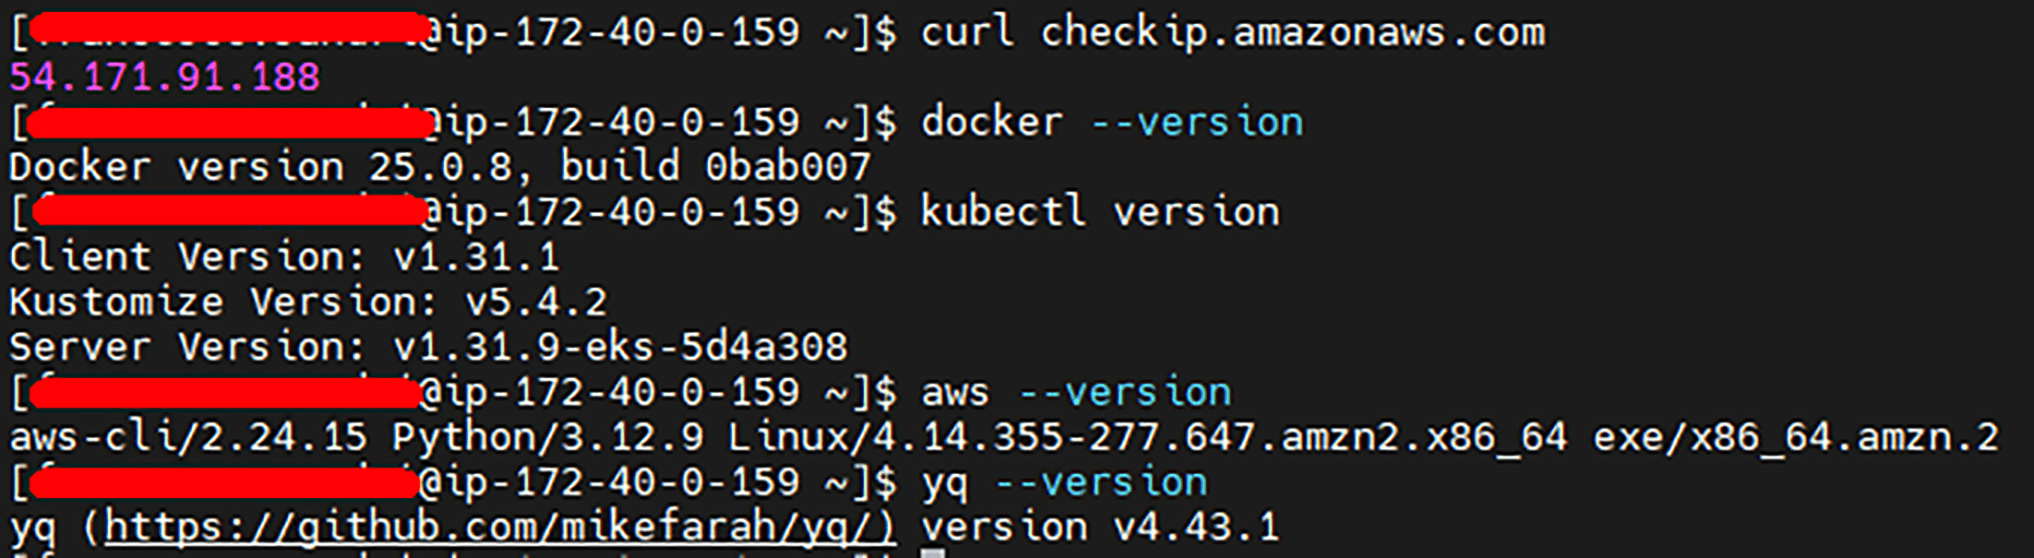
This manual assumes that installation is performed in a Linux environment, via shell.
The supporting machine must have:
Internet access (reachability to
*.amazonaws.com)Docker installed
Kubectl installed and configured for access to the target cluster
AWS CLI installed
yqtool available
Some public domains must be reachable for the product to function correctly. If internet access is limited, contact the ApiShare support team (support@apishare.cloud) to obtain the exact list of domains to whitelist.
Note: In the case of an update on an existing tenant, installation activities will cause service disruption while scripts are running. This manual will indicate when the disruption begins and ends.
Potential Issues
Excessive RAM Usage of Pods
Problem: After running the installation scripts, some pods may restart every 5–10 minutes without an apparent error. This issue has been observed on AKS (Azure) but may occur on other cloud providers as well. It seems to be related to the kernel version running on the nodes, causing a bug in cgroups.
Check: Run the following command to monitor memory usage:
If memory usage hits the default 500Mi limit shortly before a restart, you’ve found the issue.
Solution: Increase the memory limit of all microservices from 500Mi to 800Mi. This resolves the problem, as pods stabilize around 500Mi usage.
Preliminary Operations
Retrieving the Installation Package and Docker Images
Objective
This chapter describes the steps required to retrieve the installation package and the Docker images associated with the version of ApiShare to be installed.
Installation Package
The installation package is provided in .zip format and contains:
Scripts for installation and configuration;
.envand.shfiles needed to automatically retrieve Docker images;Support documentation.
The package is made available through a temporary link provided directly by the ApiShare team.
Required Actions
Download the .zip archive using the provided link:

Extract the archive into a dedicated directory. This directory will serve as the installation workspace for subsequent commands:
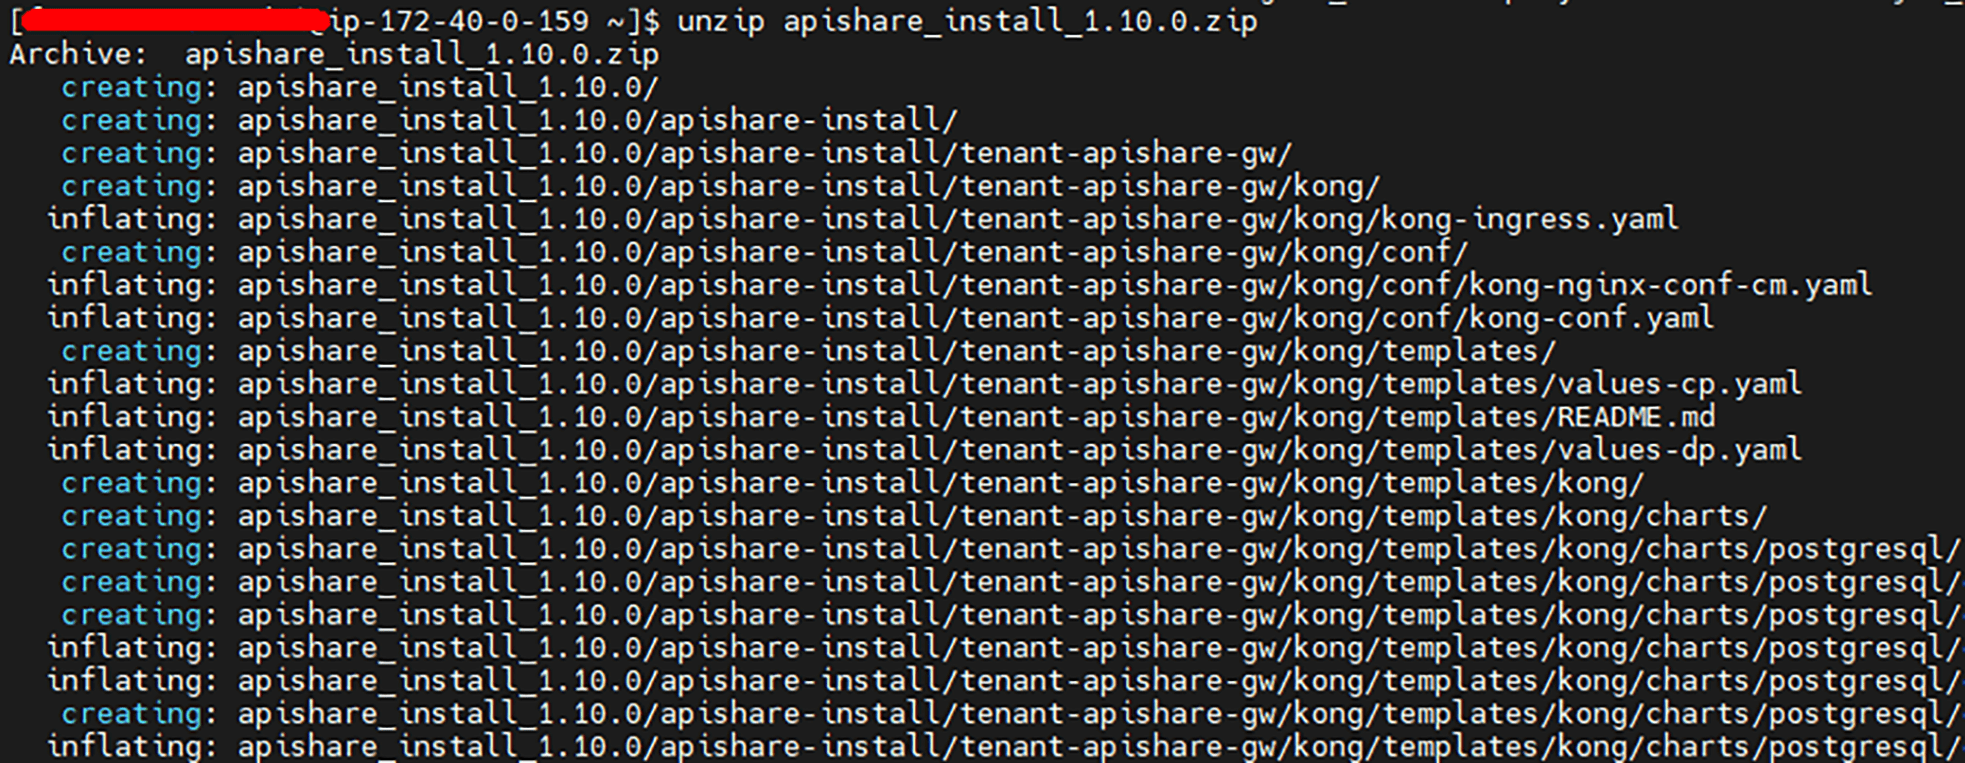
Structure and content of the zip file (simplified view):
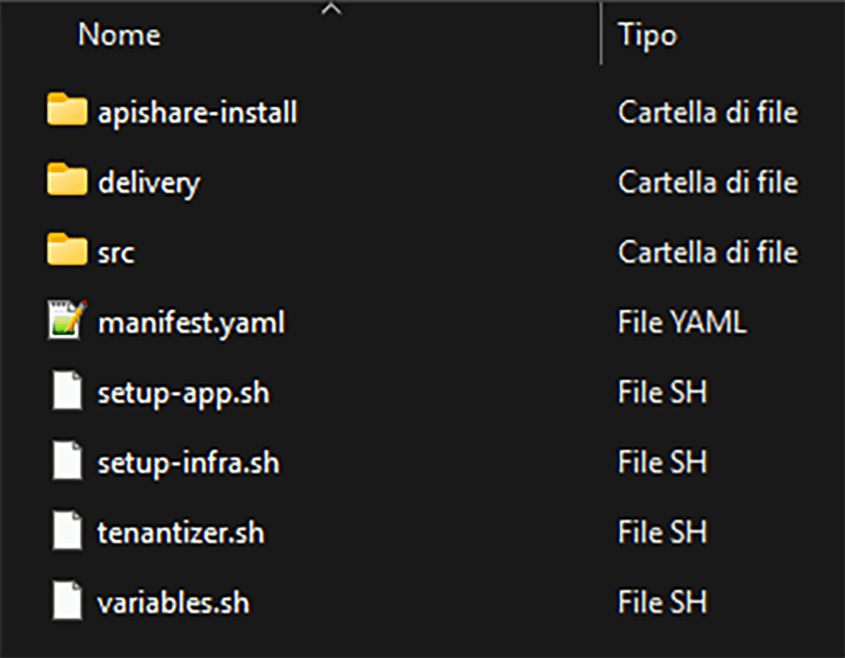
apishare-install/<tenant>-apishare-app/: Kubernetes definitions (workloads, configmaps, secrets, etc.) for application componentsms/: Kubernetes definitions for individual backend microservicesshared/: Kubernetes definitions for shared objects (mainly configmaps)webapp/: Kubernetes definition for the frontend microservice<tenant>-apishare-aux/: Kubernetes definitions for auxiliary components<tenant>-apishare-gw/: Kubernetes definitions for the internal gateway
delivery/.env: environment configuration file for correct execution ofpull-push.shpull-push.sh: script for pulling images from the ApiShare registry and pushing them to the private reporeadme.md: instructions for filling in the.envfilesrc/: release scripts for individual components, invoked by the main scriptsmanifest.yaml: preconfigured file listing components to install and activate for the tenantsetup-app.sh: script for deploying application componentssetup-infra.sh: script for deploying auxiliary componentstenantizer.sh: script for tenant name substitution (already executed by ApiShare team, not used here)variables.sh: script containing installation variables
Make all scripts executable:
Docker Images
Docker images are provided via pull from an ApiShare registry. Each product component has a specific version tag, using the following convention:
Examples:
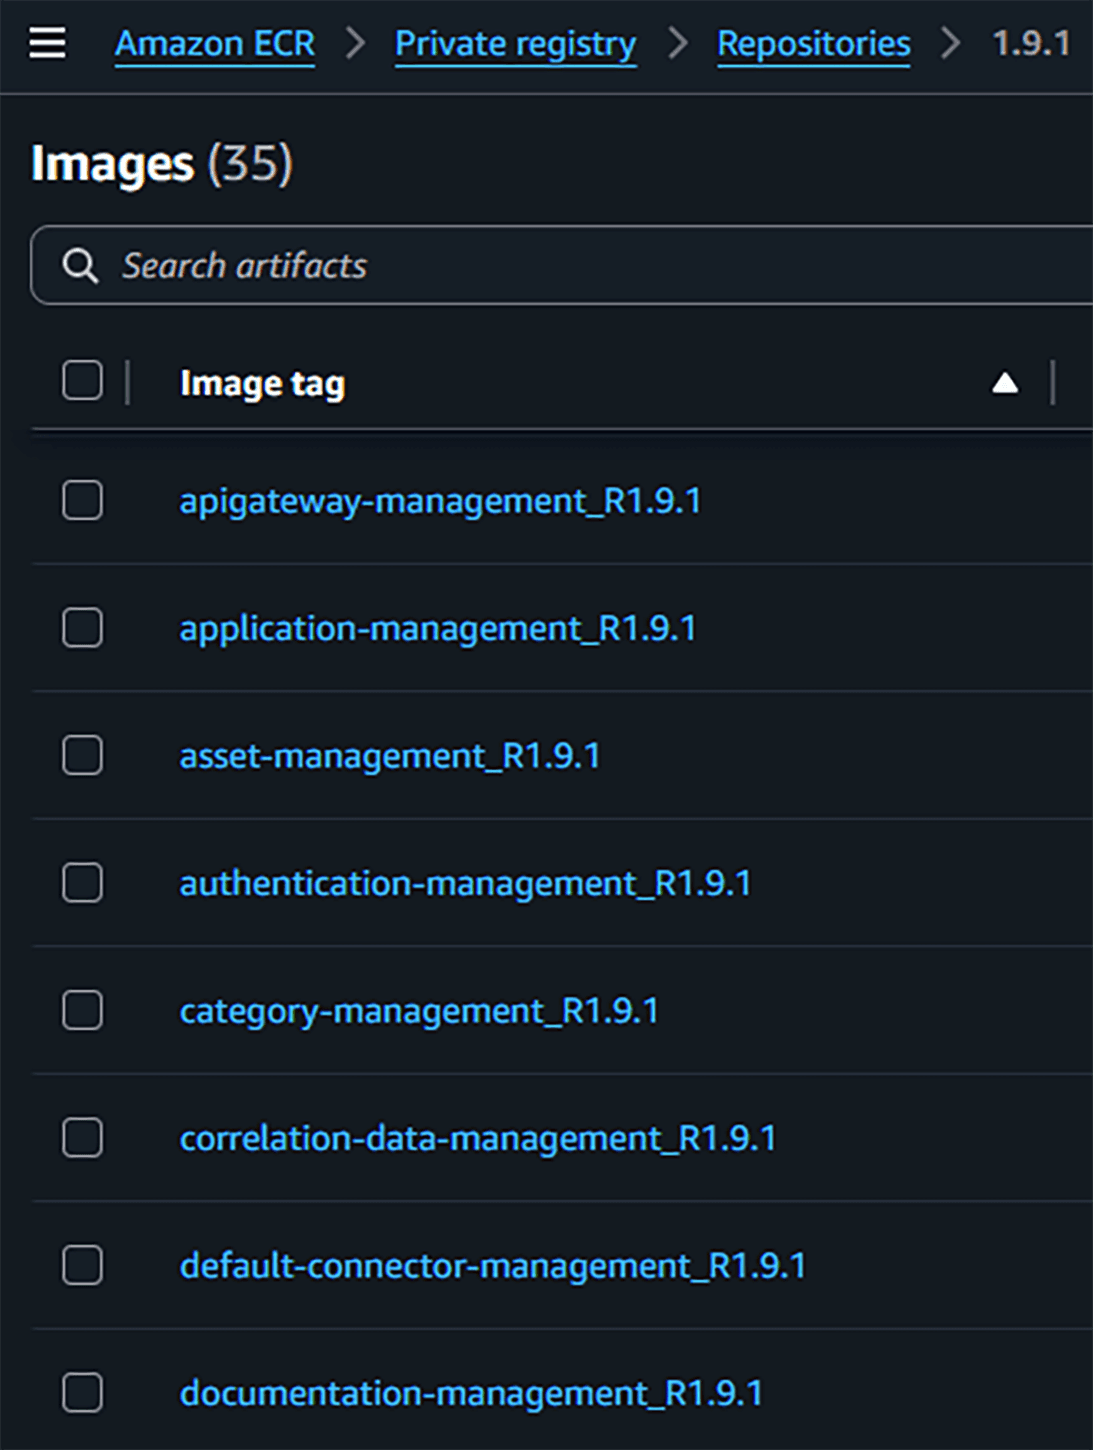
Image Retrieval Script
The pull-push.sh script automates image retrieval and is located in the delivery directory.
Fill in the .env file appropriately, using the credentials provided by the ApiShare team (see readme.md for instructions).
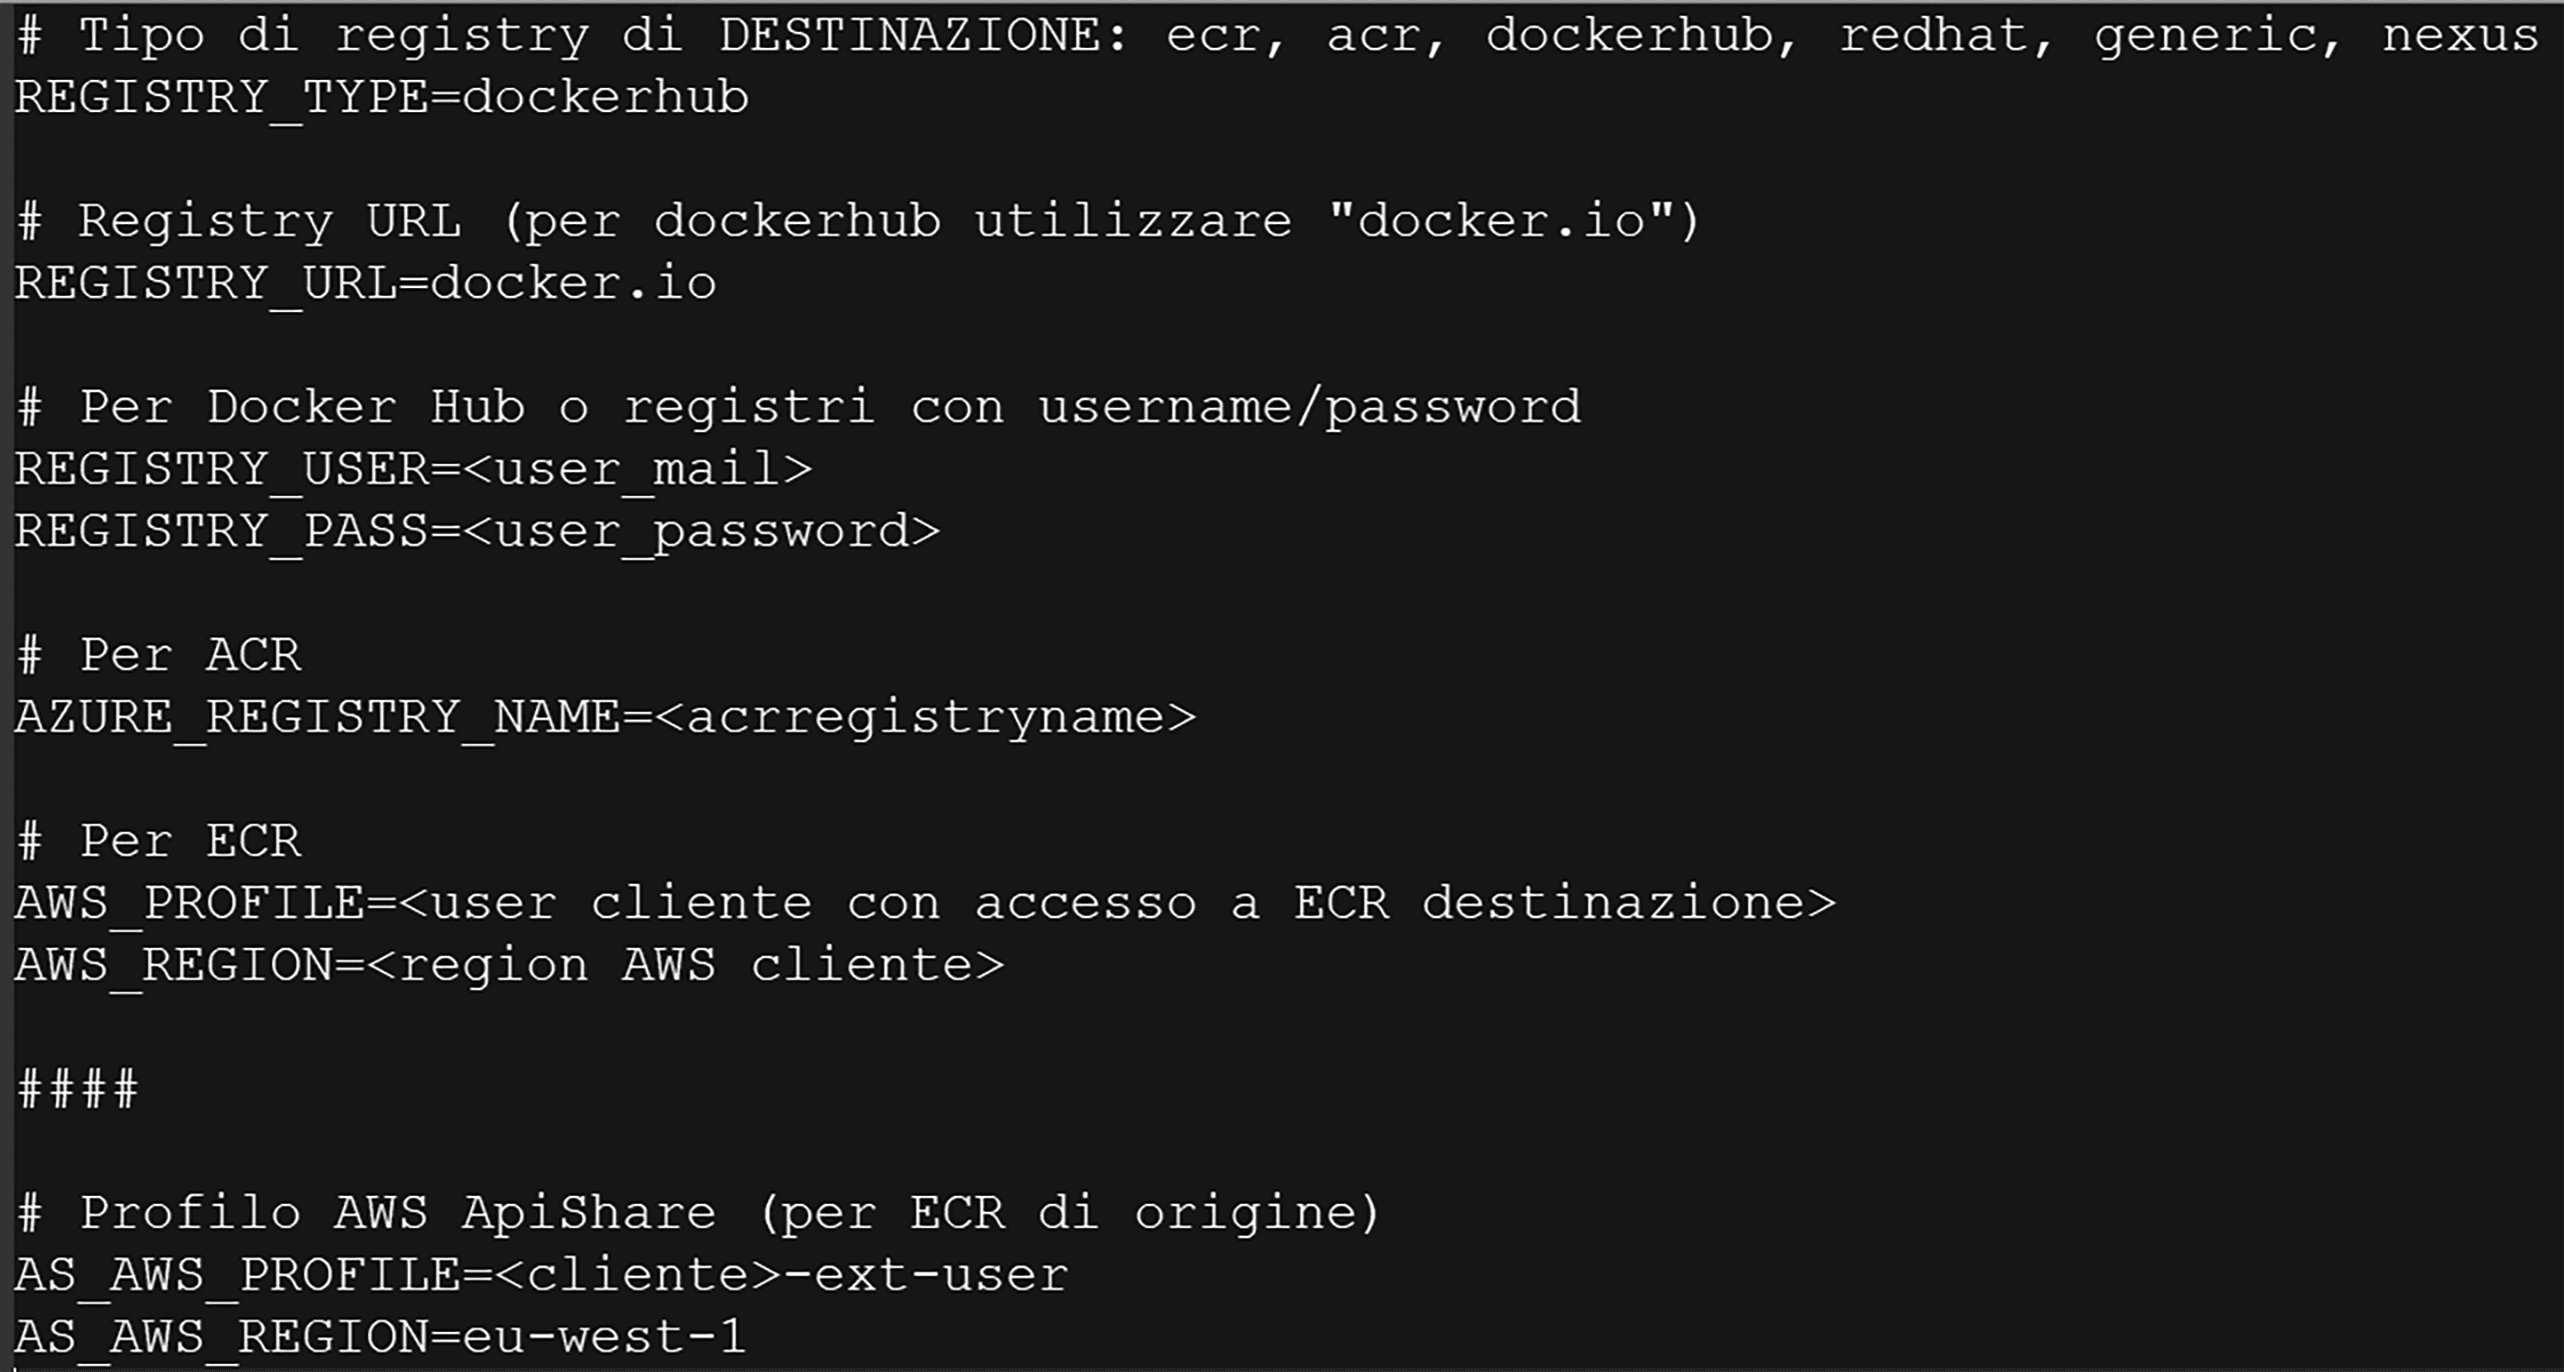
Execute the script:
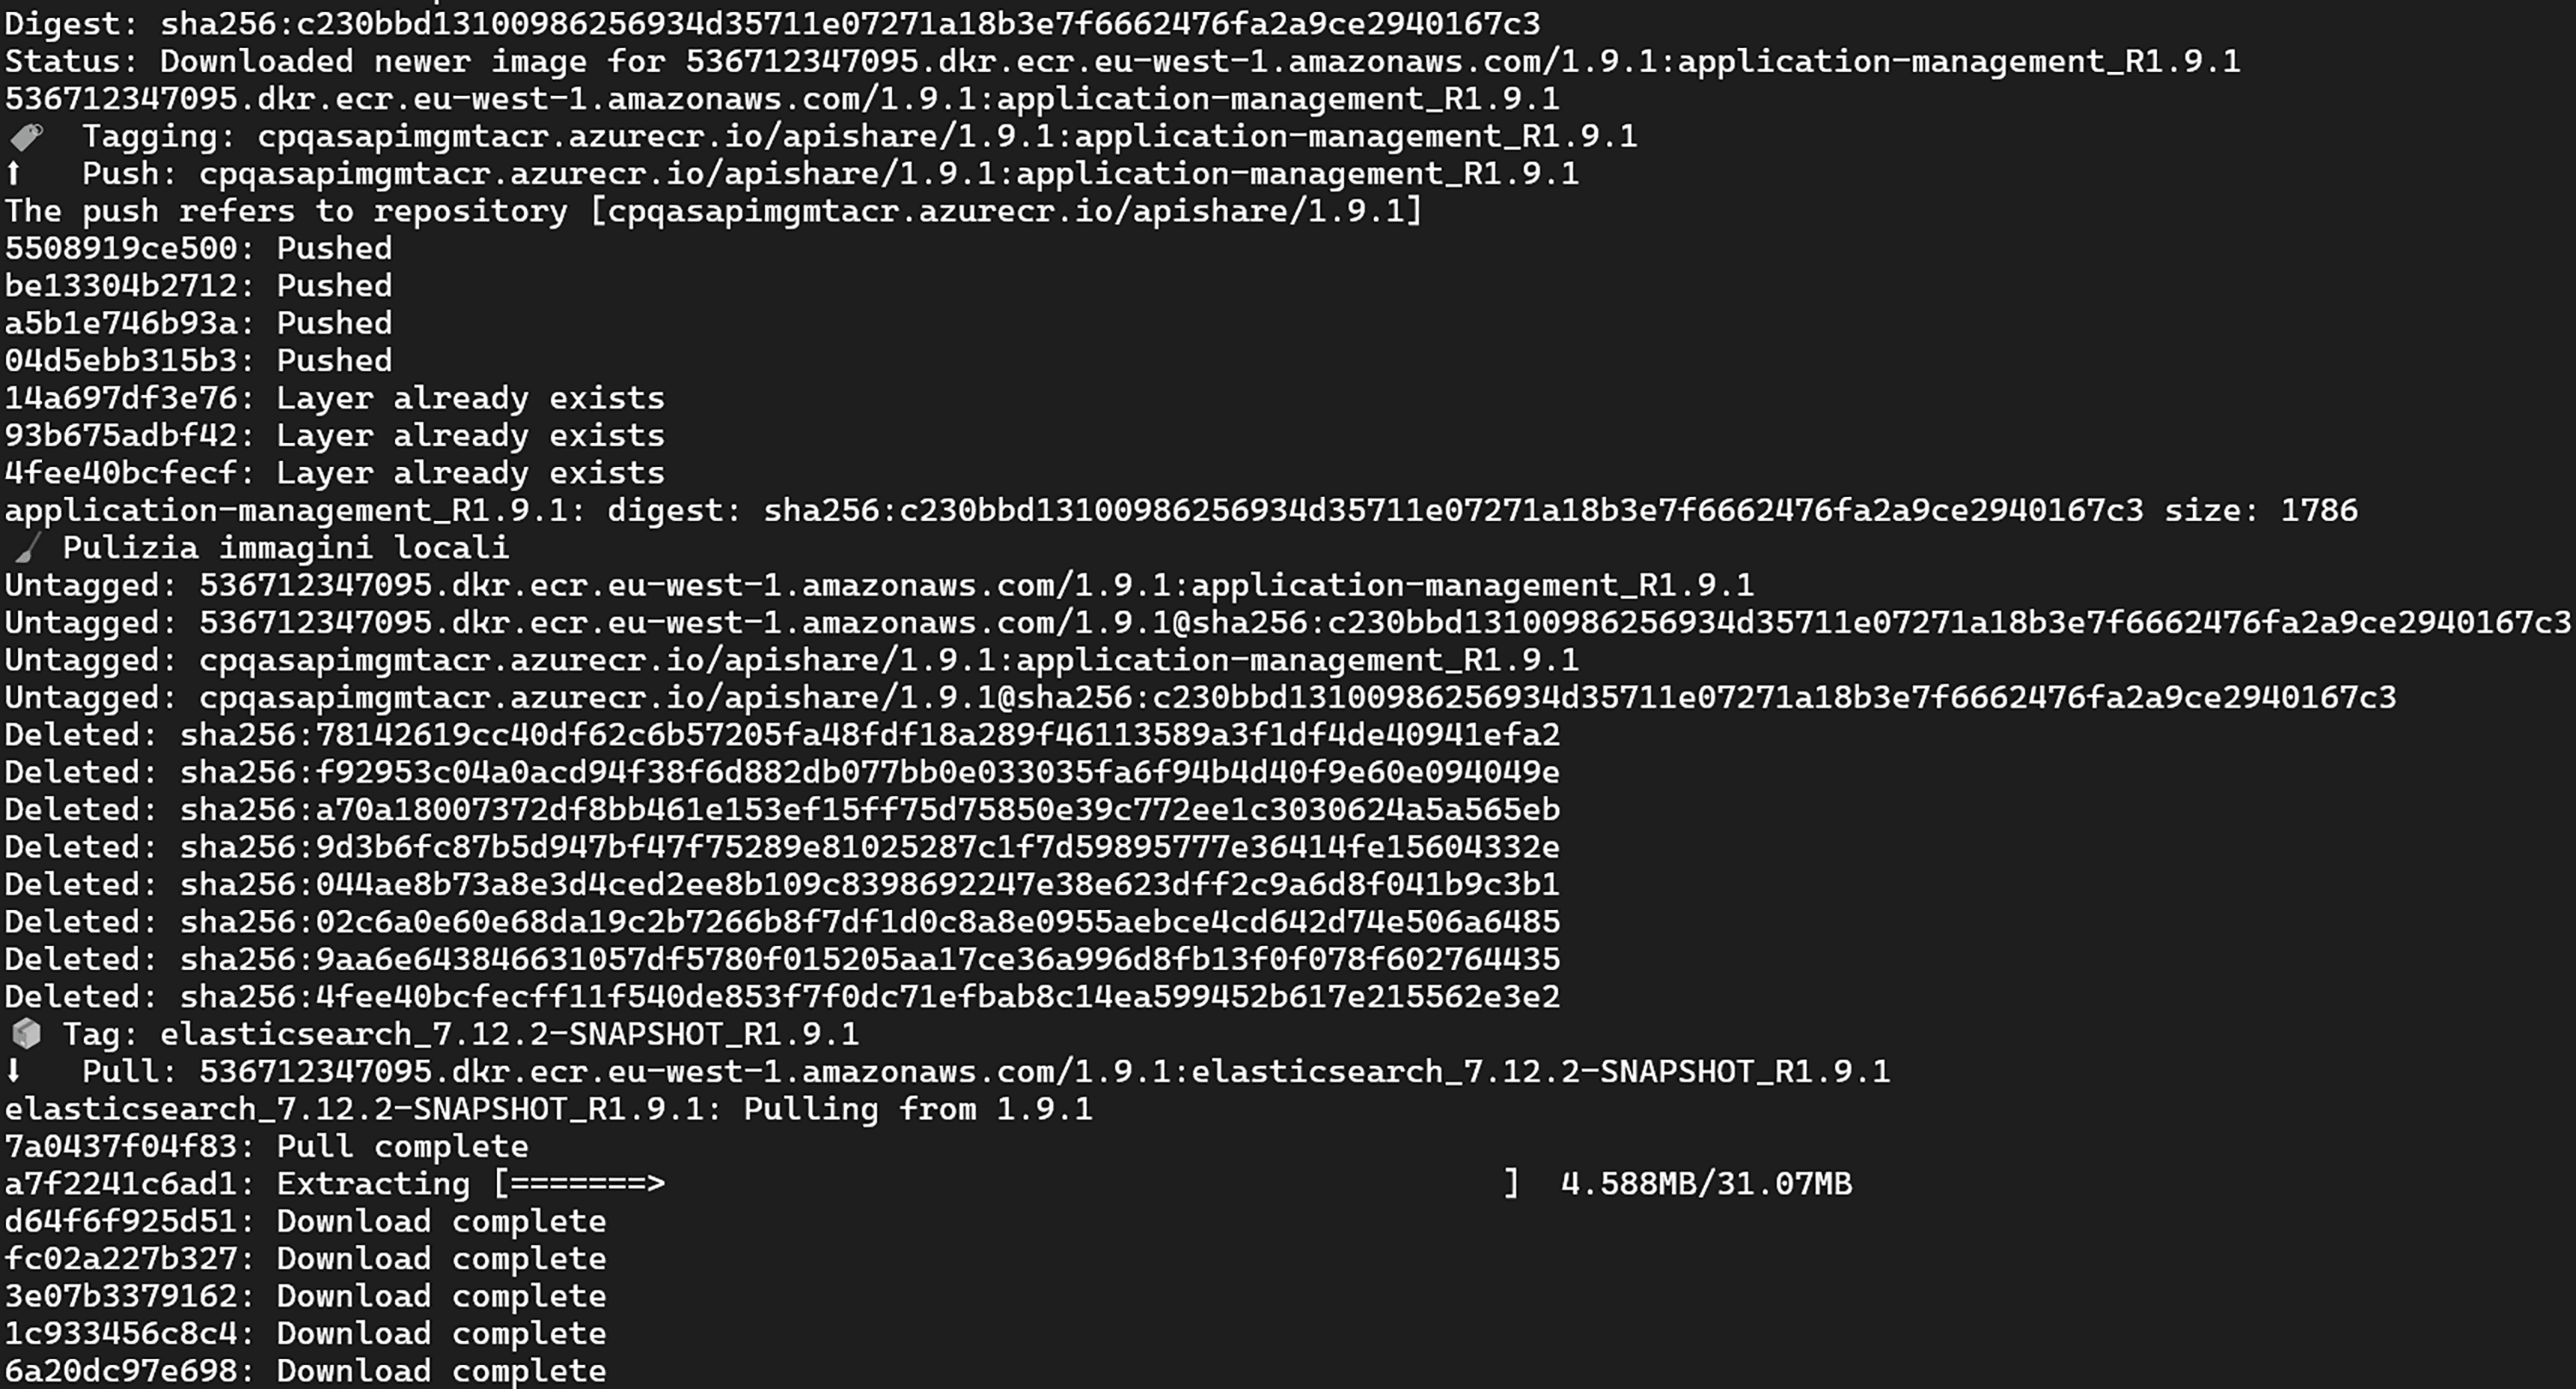
Script Functionality
Pulls images from the ApiShare ECR repository (
docker pull)Applies specific tags (
docker tag)Pushes to the client's private Docker registry (
docker push)Removes temporary local images (
docker rmi)
Here is the full list of images for version 1.11:
Cluster Access and Setup
Objective
This chapter outlines the steps needed to verify cluster accessibility and prepare it for installation.
Access and Checks
Access the Kubernetes cluster via shell or GUI.
Check the Kubernetes version running and its compatibility with the ApiShare release to be installed, using the provided matrix.
The list is not exhaustive but indicative of tested combinations. In general, ApiShare is compatible with any Kubernetes version.
K8s\ApiShare | 1.28.3 | 1.28.5 | 1.29.10 | 1.30.12 | 1.31.7 | 1.31.9 |
|---|---|---|---|---|---|---|
1.4.X | EKS |
| OpenShift |
|
|
|
1.5.X | EKS |
| OpenShift |
| EKS |
|
1.6.X | EKS | AKS |
| AKS |
|
|
1.7.X | EKS |
|
|
|
| EKS |
1.8.X |
|
|
|
|
| EKS |
1.9.X |
|
| OpenShift | AKS |
| EKS |
1.10.X |
|
|
|
|
| EKS |
1.11.X |
|
| OpenShift |
|
|
|
Setup
Create the following namespaces:
<tenant>-apishare-gw<tenant>-apishare-aux<tenant>-apishare-app
Manually create product volumes if provisioning is not automatically handled by Kubernetes (depending on storageClass and cluster config). Indicative list:
Name | PVC Namespace | Size (GB) |
|---|---|---|
apishare-webapp | <tenant>-apishare-app | 1 |
apishare-data-rabbitmq-0 | <tenant>-apishare-aux | 3 |
apishare-data-rabbitmq-1 | <tenant>-apishare-aux | 3 |
apishare-data-rabbitmq-2 | <tenant>-apishare-aux | 3 |
apishare-es-data-search-frontend | <tenant>-apishare-aux | 1 |
apishare-keycloak | <tenant>-apishare-aux | 1 |
apishare-kong | <tenant>-apishare-gw | 8 |
apishare-mongodb | <tenant>-apishare-aux | 5 |
apishare-postgres | <tenant>-apishare-aux | 5 |
Deploy a test pod and run the following basic checks:
Public internet connectivity
Ability to write files to the container’s root
Ability to use/provision a volume
If internet access is limited, contact ApiShare support (support@apishare.cloud) to obtain the exact list of domains to whitelist.
Pre-configuration
Objective
This chapter summarizes the steps for pre-configuring the installation workspace, Kubernetes definitions, and product components.
All activities in this chapter are handled by the ApiShare PSG team before delivering the installation package. No changes are expected from the installer, unless otherwise instructed.
Workspace Setup
The workspace is "tenantized" with the customer tenant name inserted in all relevant locations.
Kubernetes Definitions Setup
Kubernetes resources are configured to interact correctly with the customer context and reflect any agreed-upon branding or customizations.
ApiShare Component Setup
Both auxiliary and application components are customized and configured for the tenant environment, as above.
Installation Procedure
Objective
This chapter describes the necessary steps to correctly execute the installation scripts.
In the case of an update on an existing ApiShare tenant, the operations described below will cause service disruption for users. Take appropriate precautions before proceeding.
During script execution, you can monitor the startup of tenant components with the following command:
Alternatively, graphical tools (e.g., k9s or similar) or the cluster GUI (e.g., Rancher, Openshift, EKS, AKS, etc.) can be used.
Auxiliary Components
If performing an update and the tenant is running, scale all workloads in the application and auxiliary namespaces to 0 and delete all statefulsets in the auxiliary namespace:
Run the auxiliary components installation script:
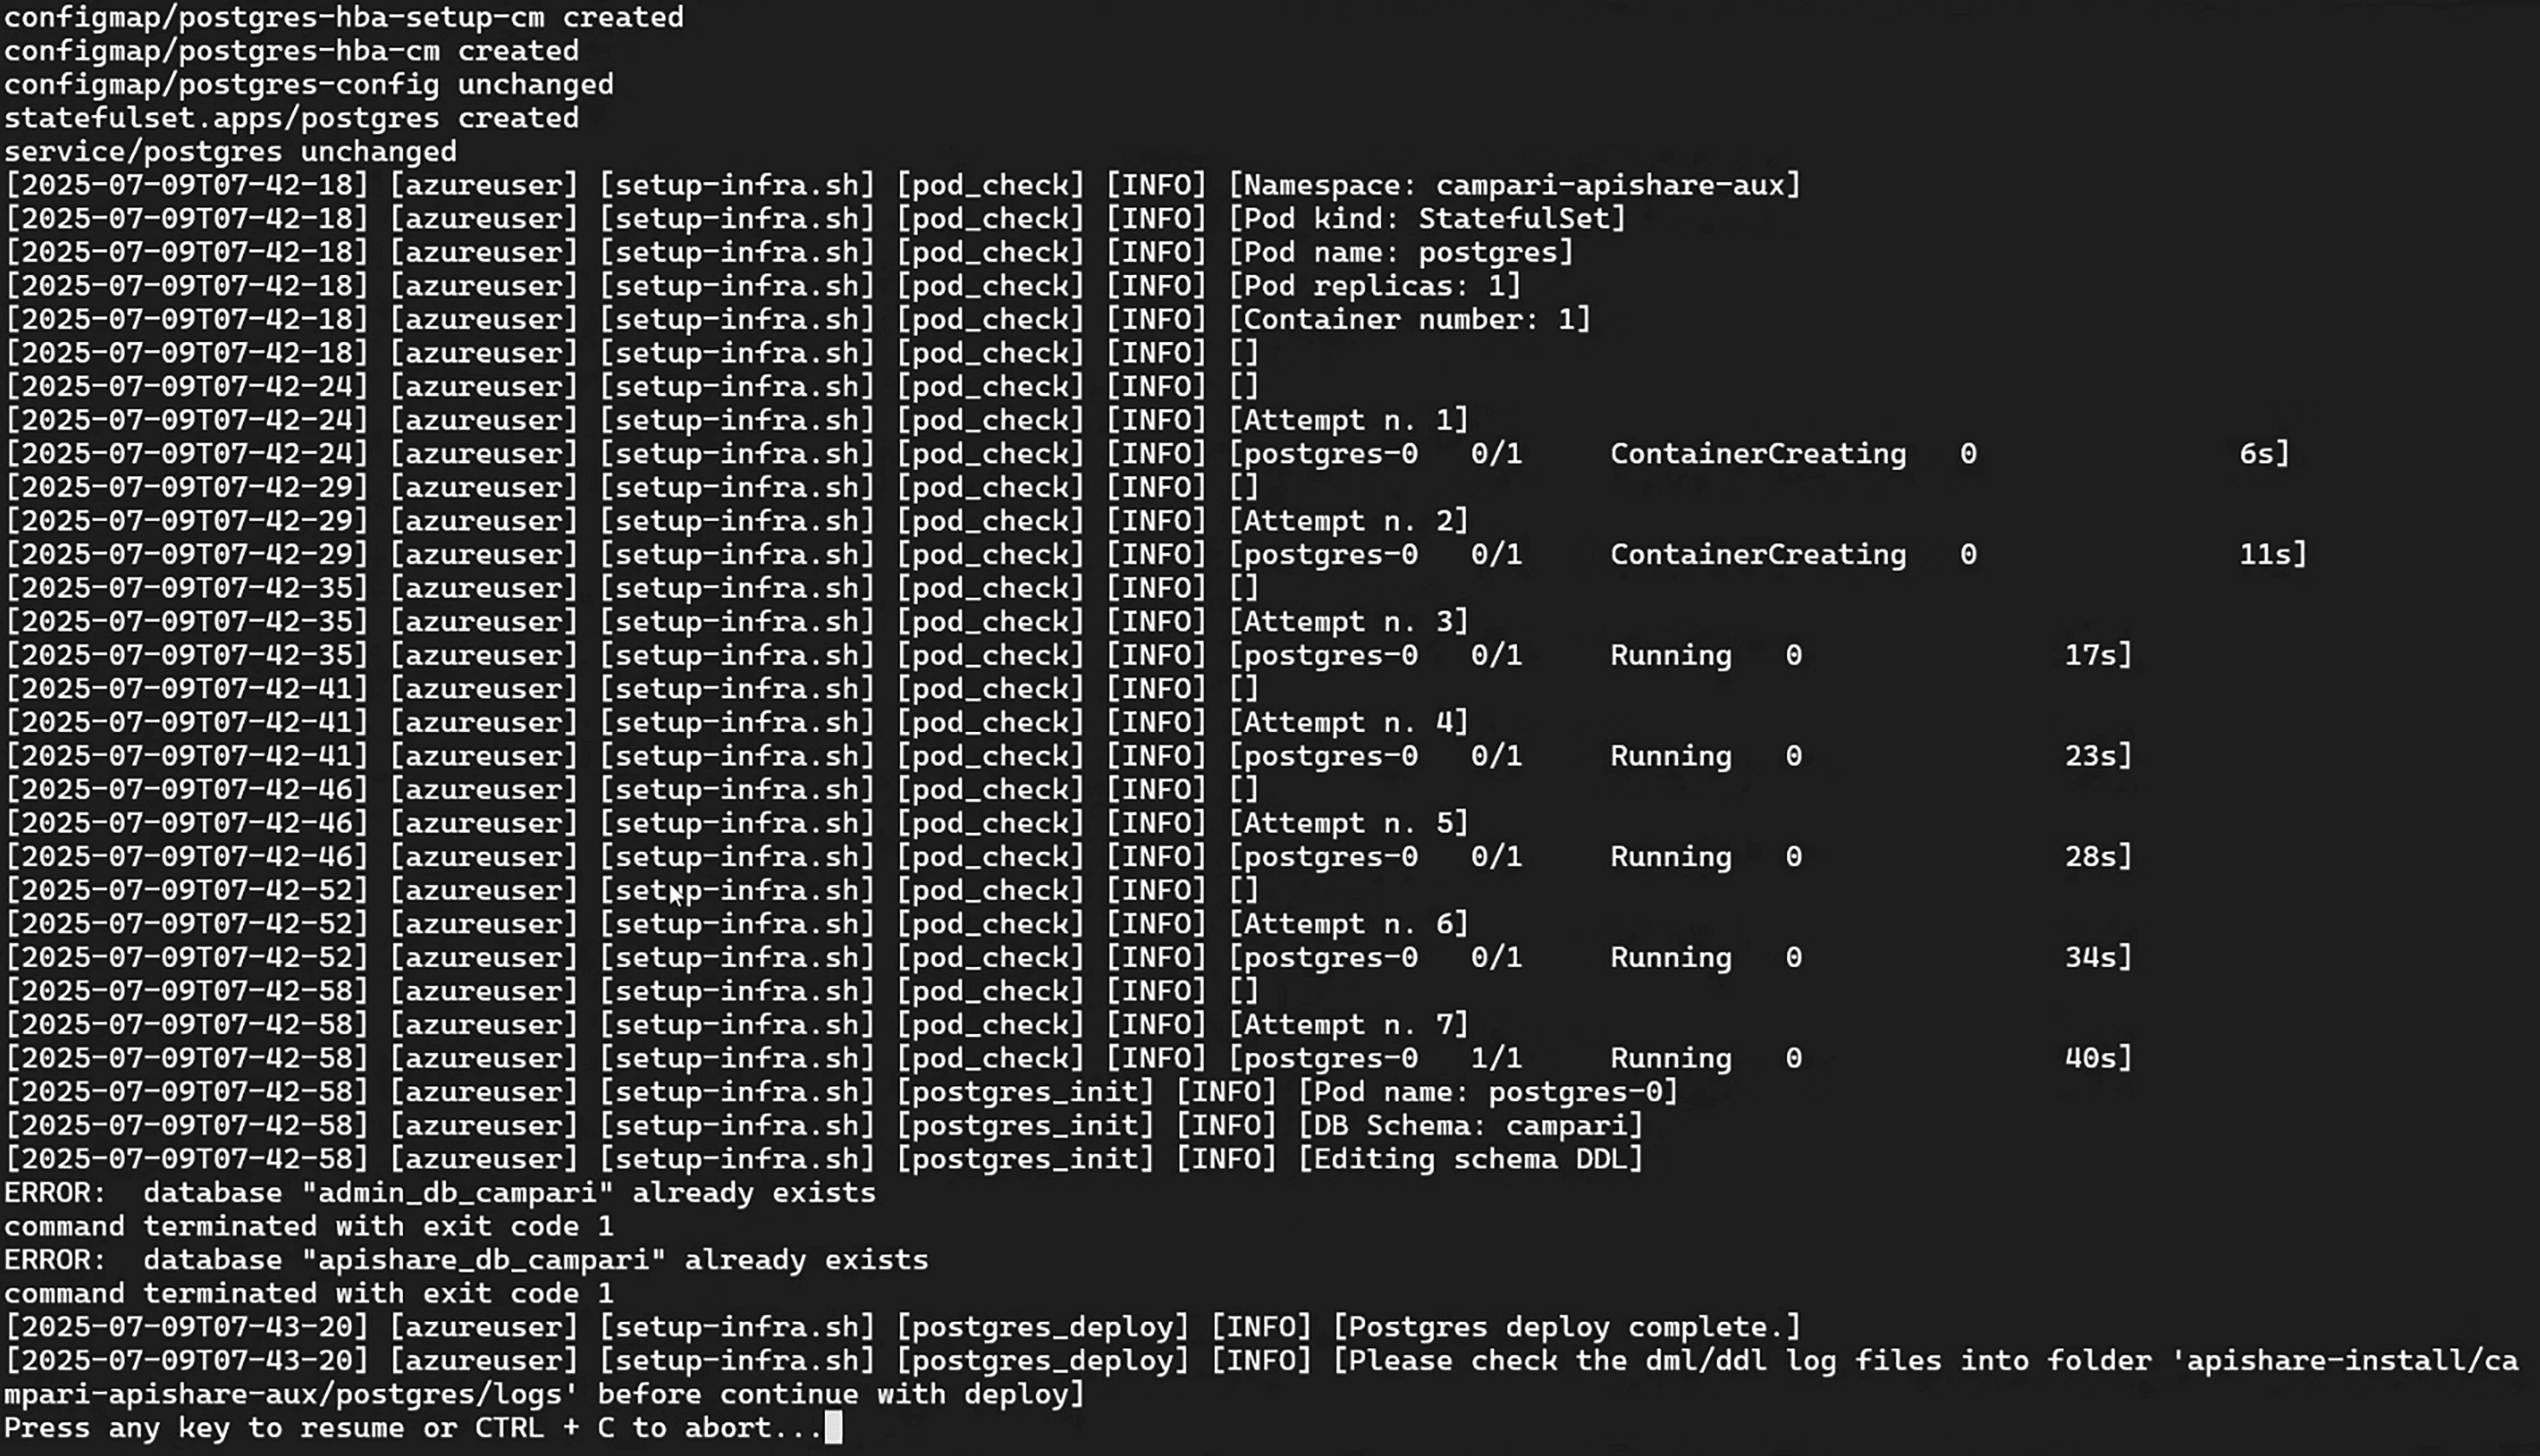
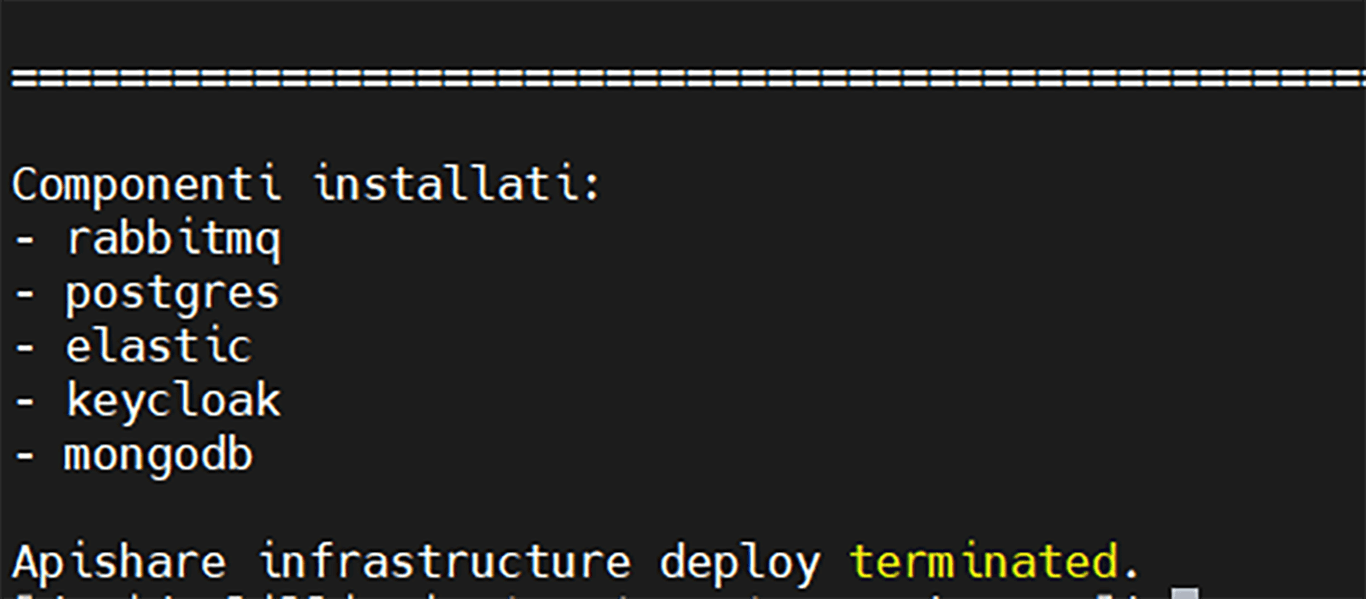
The script installs the auxiliary components listed in manifest.yaml. The exact list may vary depending on preconfigured settings. Possible components and installation order:
kong
rabbitmq
postgres
elasticsearch
keycloak
mongodb
The script pauses after installing Postgres and running the database structure and population queries. Move to the logs directory and check for errors:
No relevant errors should be present. Otherwise, contact ApiShare support (support@apishare.cloud) for guidance.
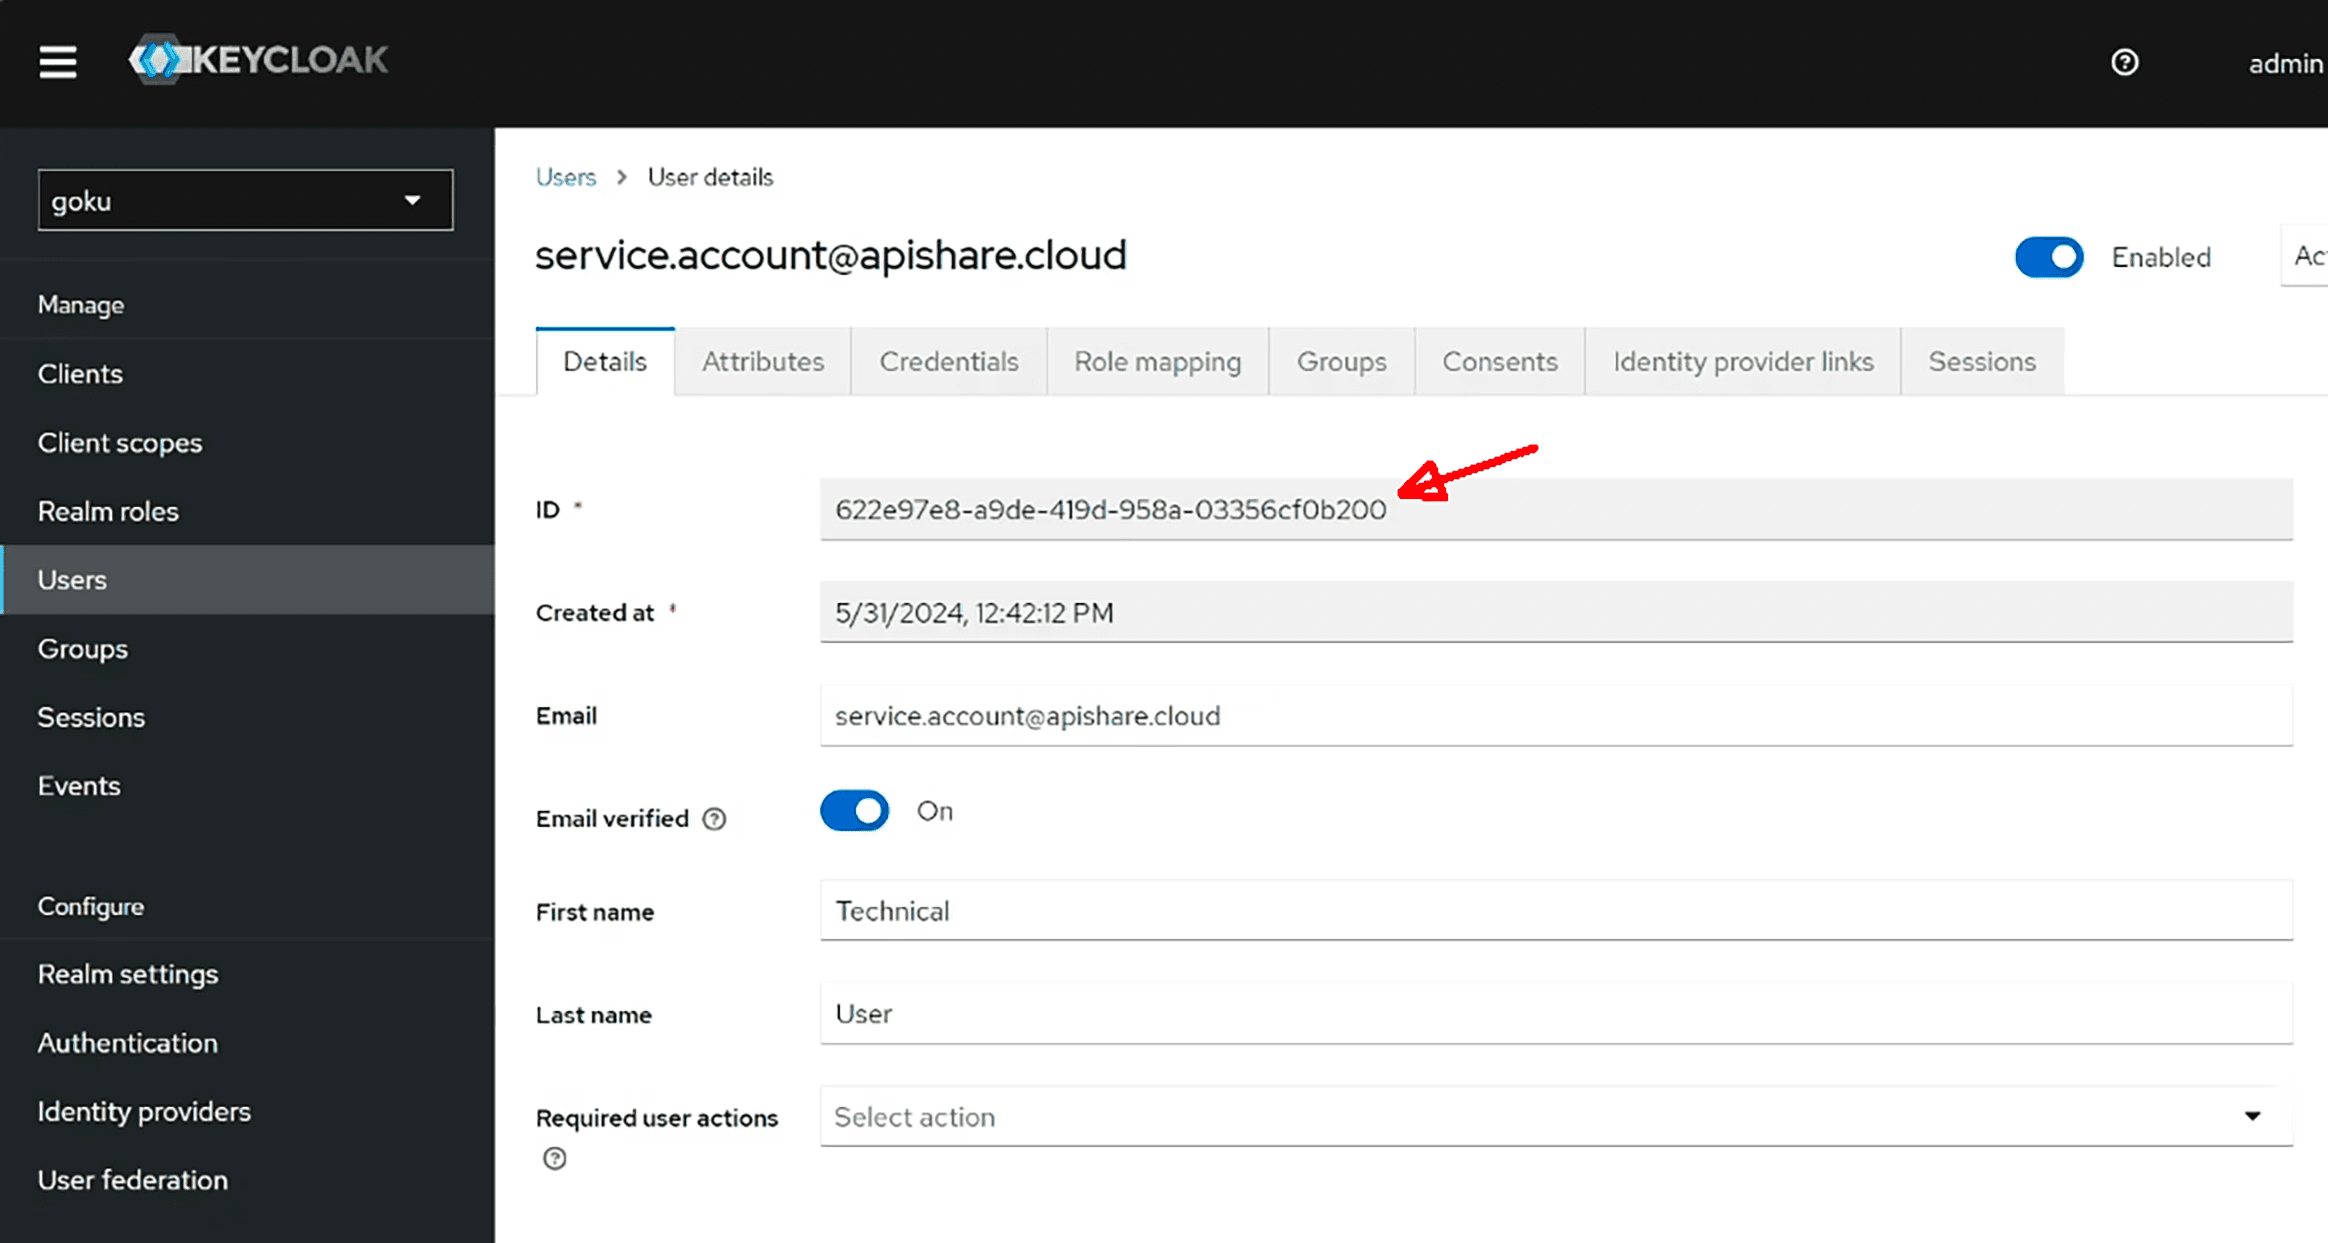
At the end of the Keycloak stage, the UUID of the technical user service.account@apishare.cloud is printed. If this is a first-time installation, note this UUID for a later step.

After the installation is completed an output similar to the following is printed:
Application Components
Application component startup depends on successful auxiliary component setup. Ensure those are up & running before proceeding.
Run the script:

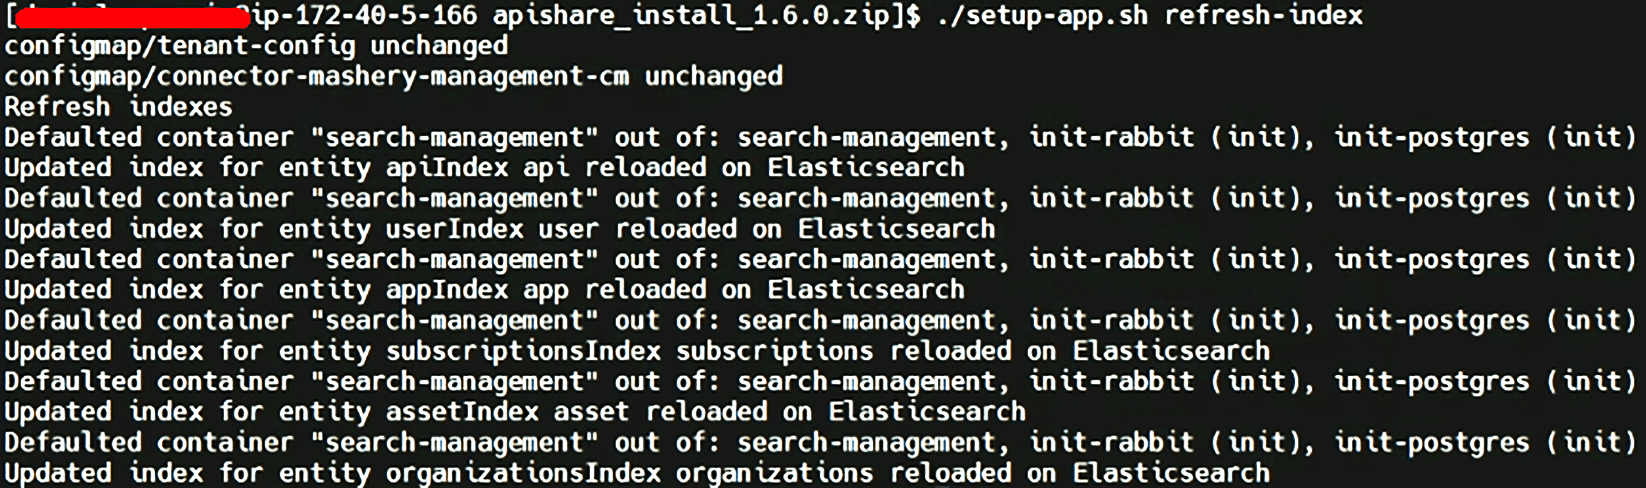
Once completed, refresh the Elasticsearch search index cache:
From this point on, in case of a tenant update, the product is considered available again. However, it is recommended to complete Post-Installation Checks before restoring user access.
For a first-time installation, connector setup can now proceed.
Each connector has its own installation process and manual. Connector delivery and Docker image management are not part of this guide.
In the case of an update, check the release notes and remove any deprecated components.
For detailed instructions, manuals and specific removal procedures contact ApiShare support (support@apishare.cloud).
Basic Product Configuration
Objective
This chapter outlines the steps for the initial basic configuration of the platform. It does not cover business-specific application configurations, which are handled pre-installation (see Pre-configuration chapter) and via GUI after installation.
These steps are required only for first-time installations. If you are updating the product you should skip this chapter entirely.
The actions here detailed require access to internal product components. Since the access method depends on Kubernetes cluster specifics and tooling preferences, detailed instructions are not provided.Generally speaking you will need to create a port-forward/tunnel from a local machine (with GUI, browser, and DB explorer) to the following internal services in namespace
<tenant>-apishare-aux:
keycloak(port 8080)
postgres(port 5432)For Postgres, commands can also be executed directly inside the pod.Both services require valid credentials.
Redirect URIs Configuration
Access the admin GUI of the Identity Provider (Keycloak).
Select Administration Console.
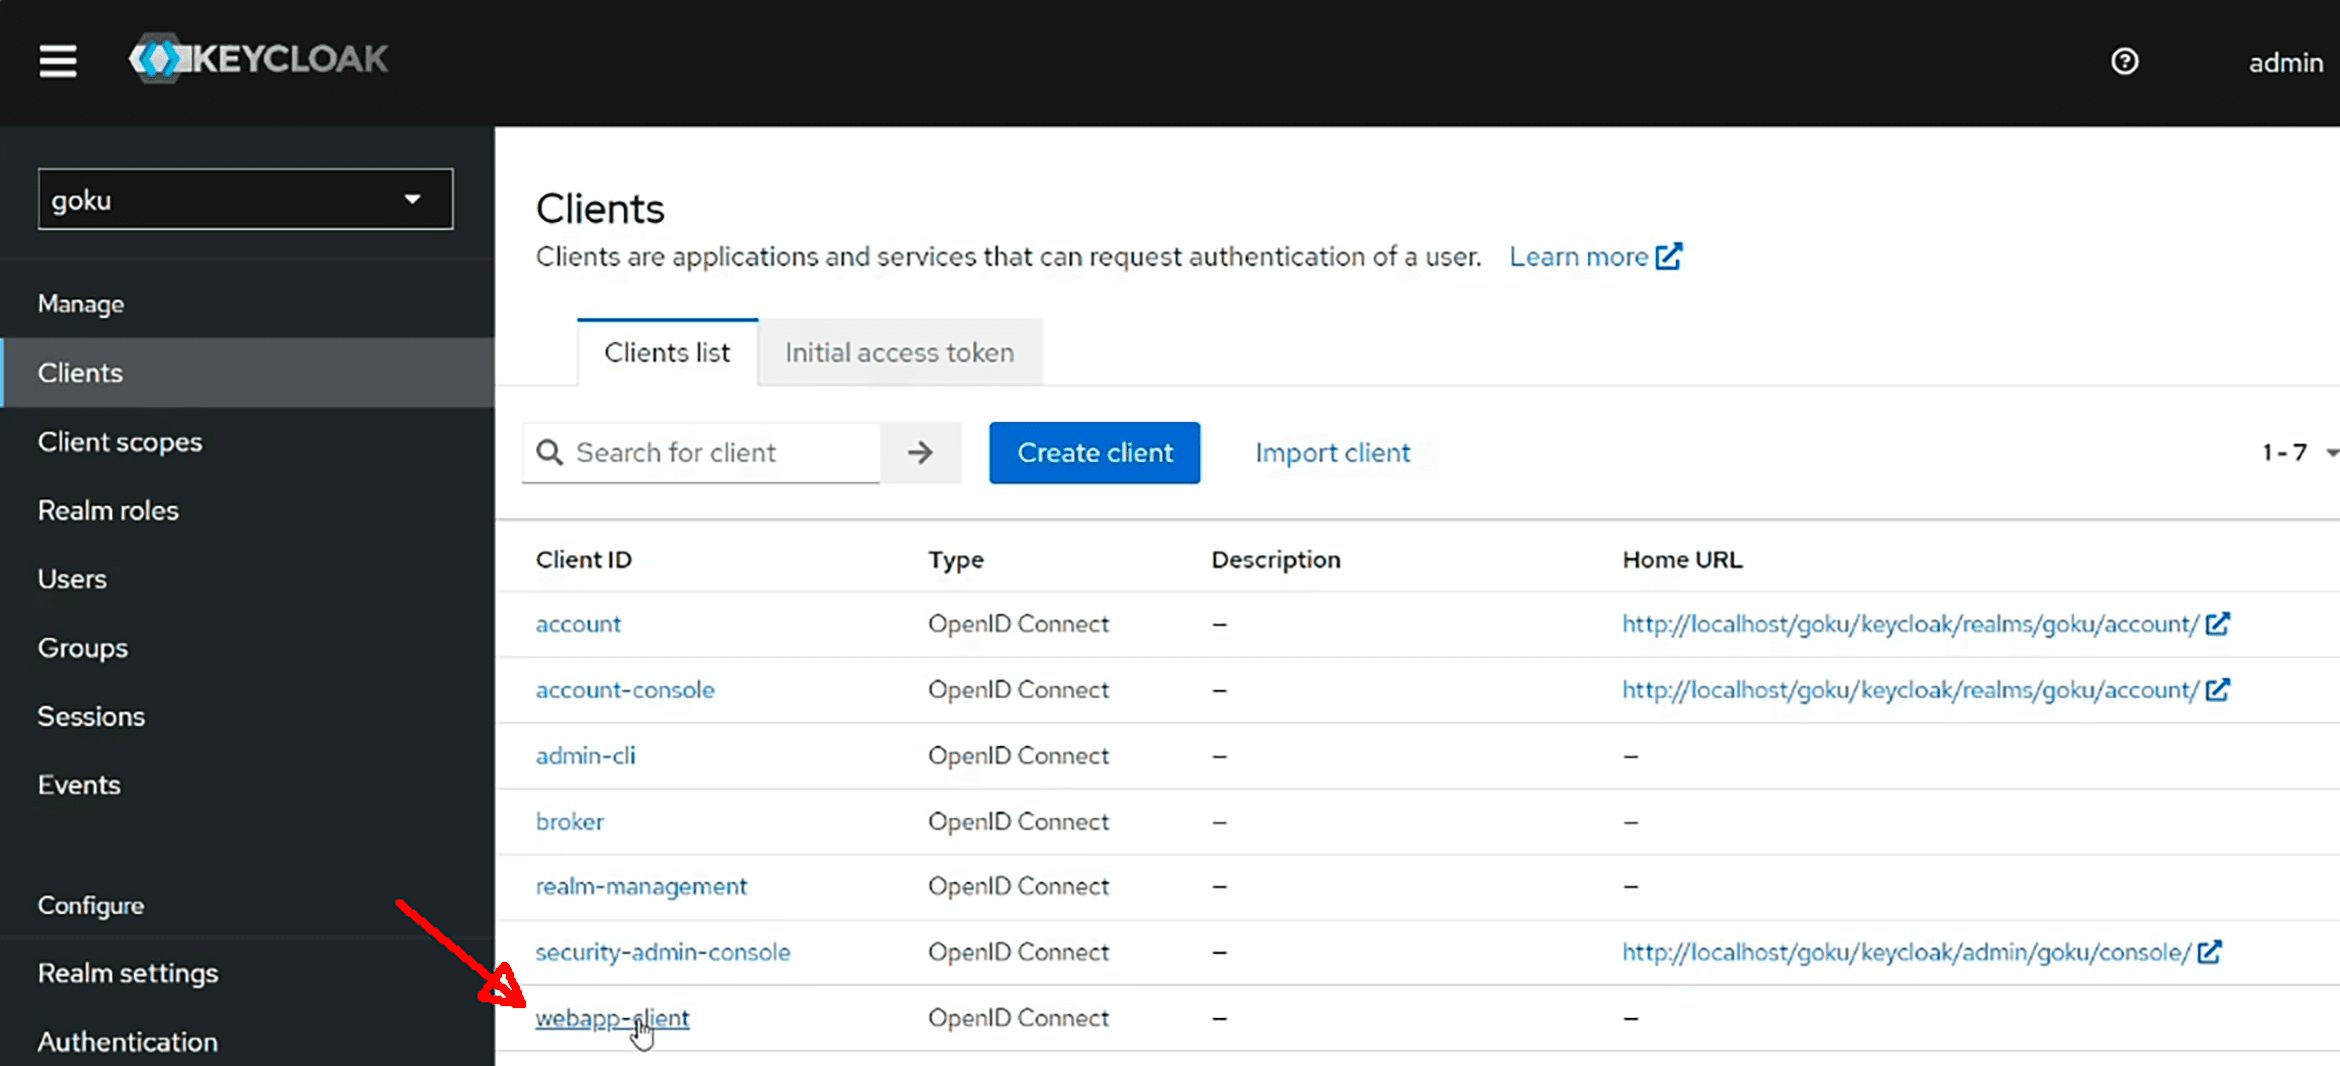
Choose the realm <tenant>.

Go to Clients → webapp-client.
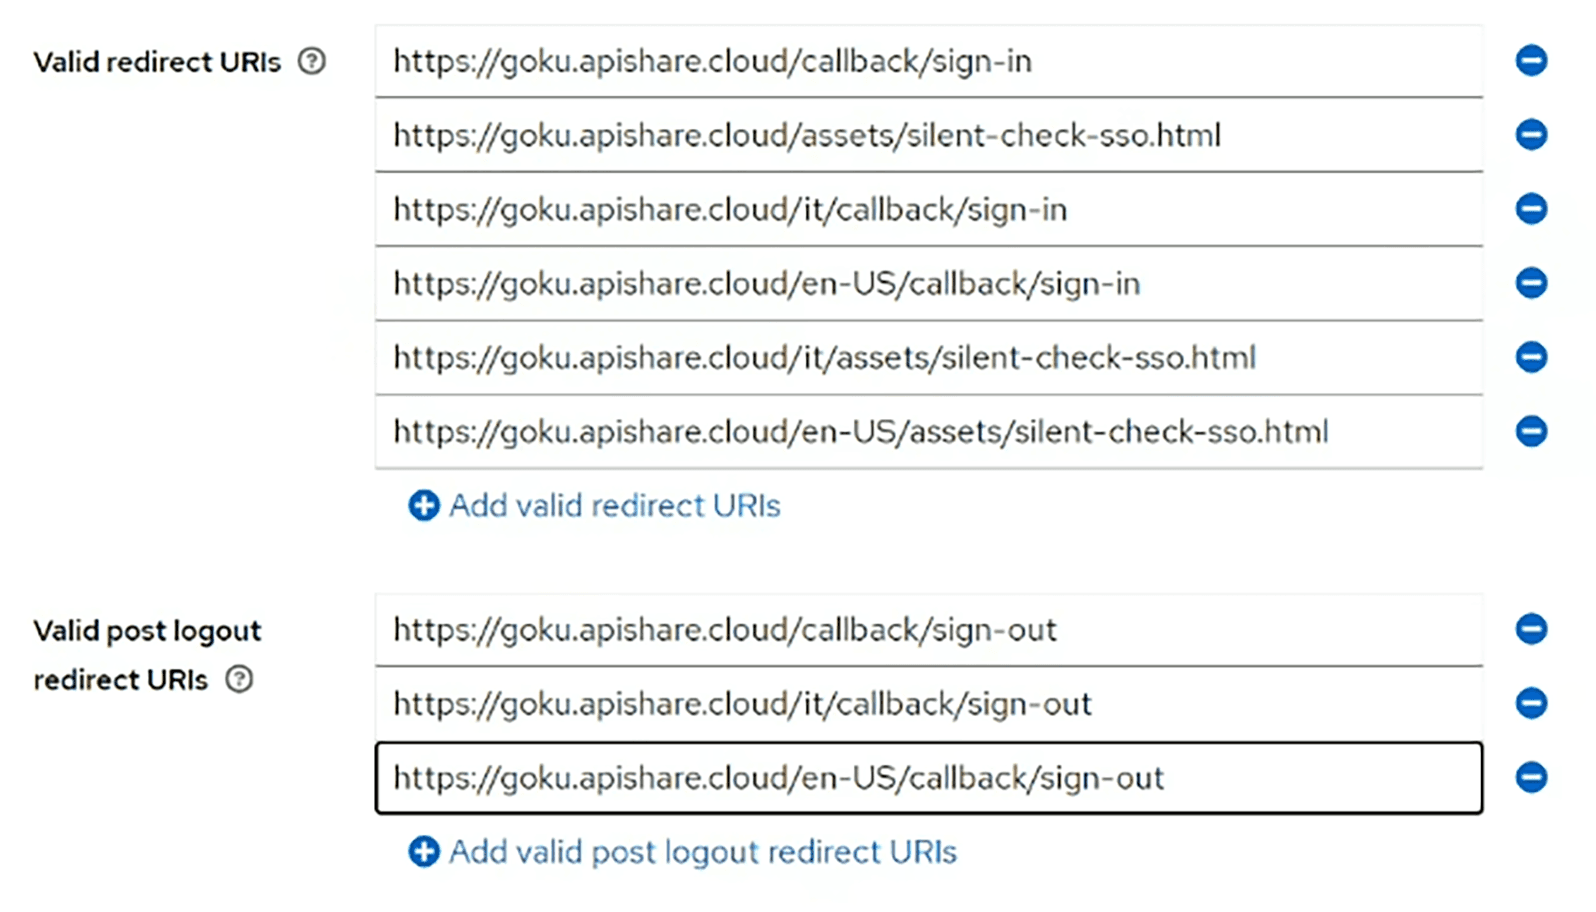
Under Valid Redirect URIs and Valid Post Logout Redirect URIs, add the necessary endpoints, including all supported languages.
Tenant Owner User Profiling
If the UUID of service.account@apishare.cloud was not saved earlier (during the auxiliary installation), do so now:
Go to the Users menu in Keycloak.
Select the technical user and copy its UUID.
Then, access the Postgres database and assign the tenant owner role to this user. Example PSQL commands (can also be run through other DB tools):
Post-Installation Checks
Objective
This chapter details technical checks to confirm that the installation was successful and that ApiShare is functioning correctly.
Landing Page & Login
Open the ApiShare homepage at the configured frontend URL.
In
<home>/environment.yaml, verify that theversionfield matches the installed release version.Log in with the
service.account@apishare.clouduser and check that the homepage and all sections in the left-side panel load correctly, monitoring for errors via browser console (Network tab).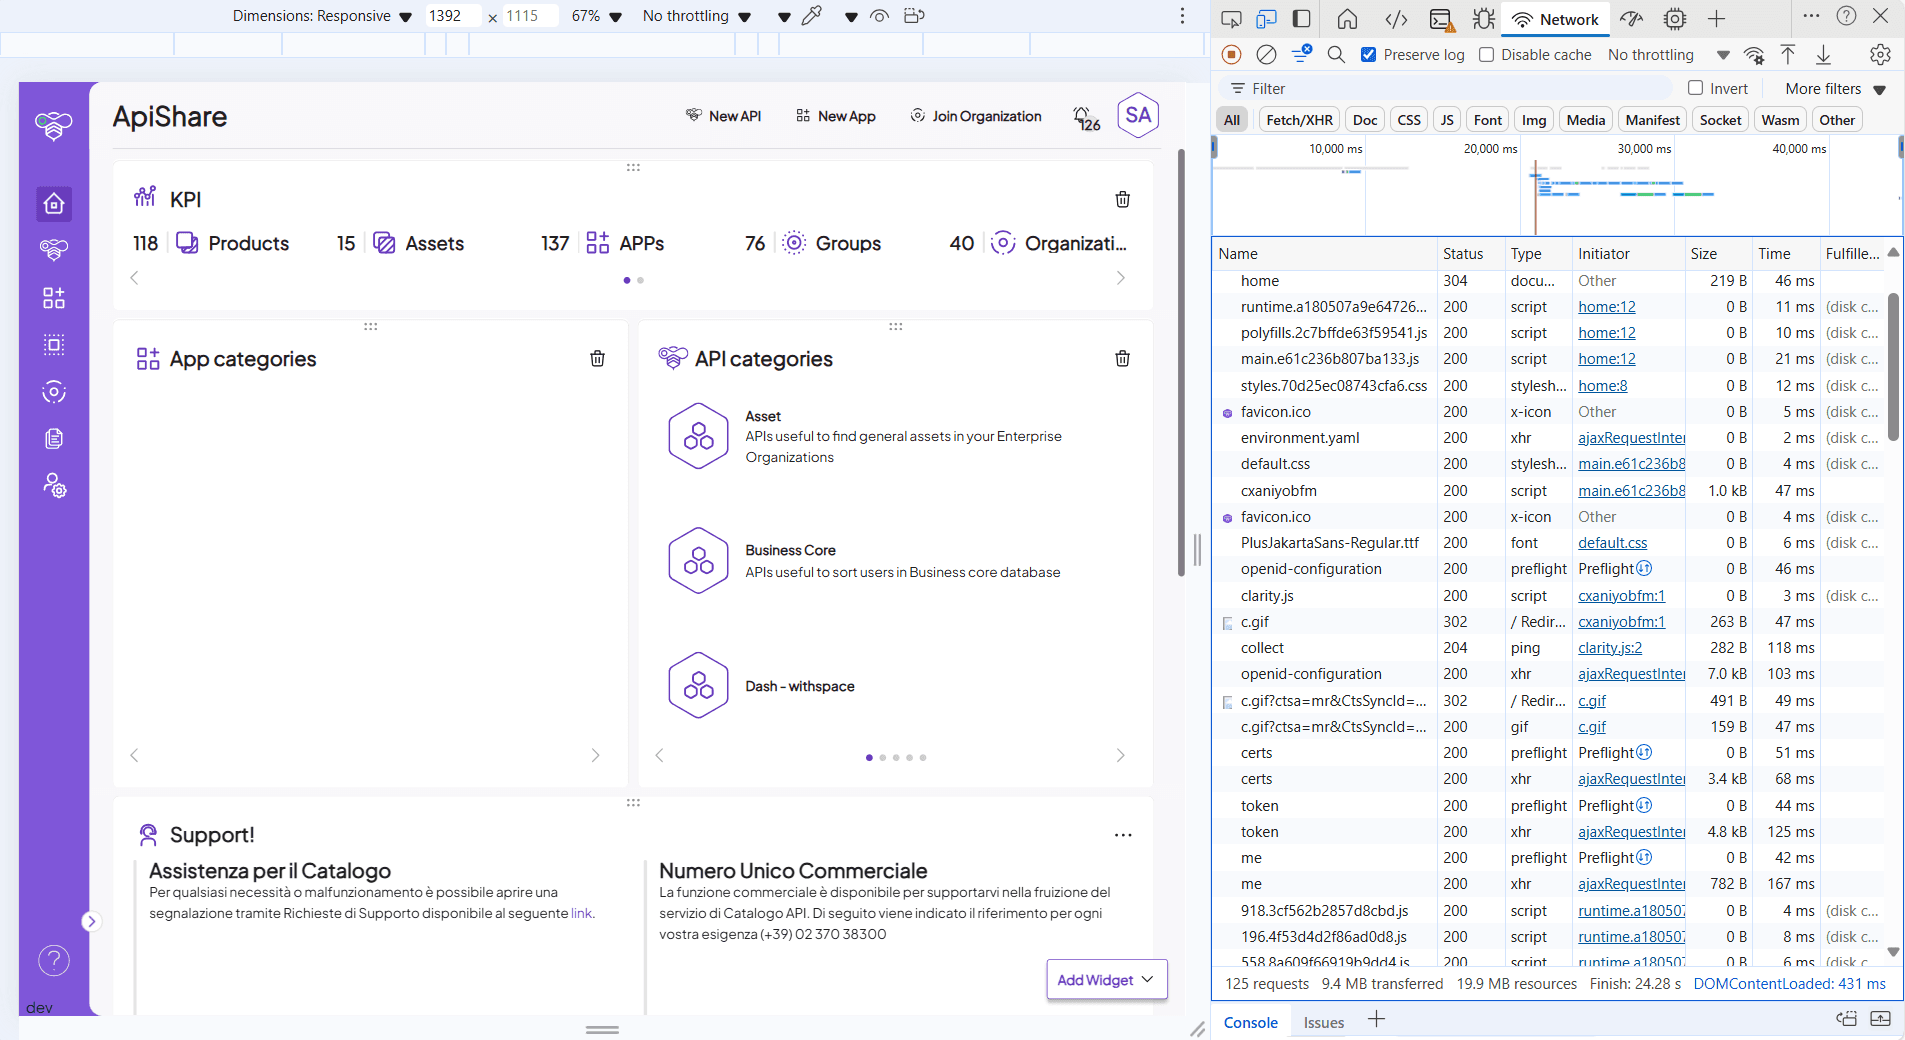
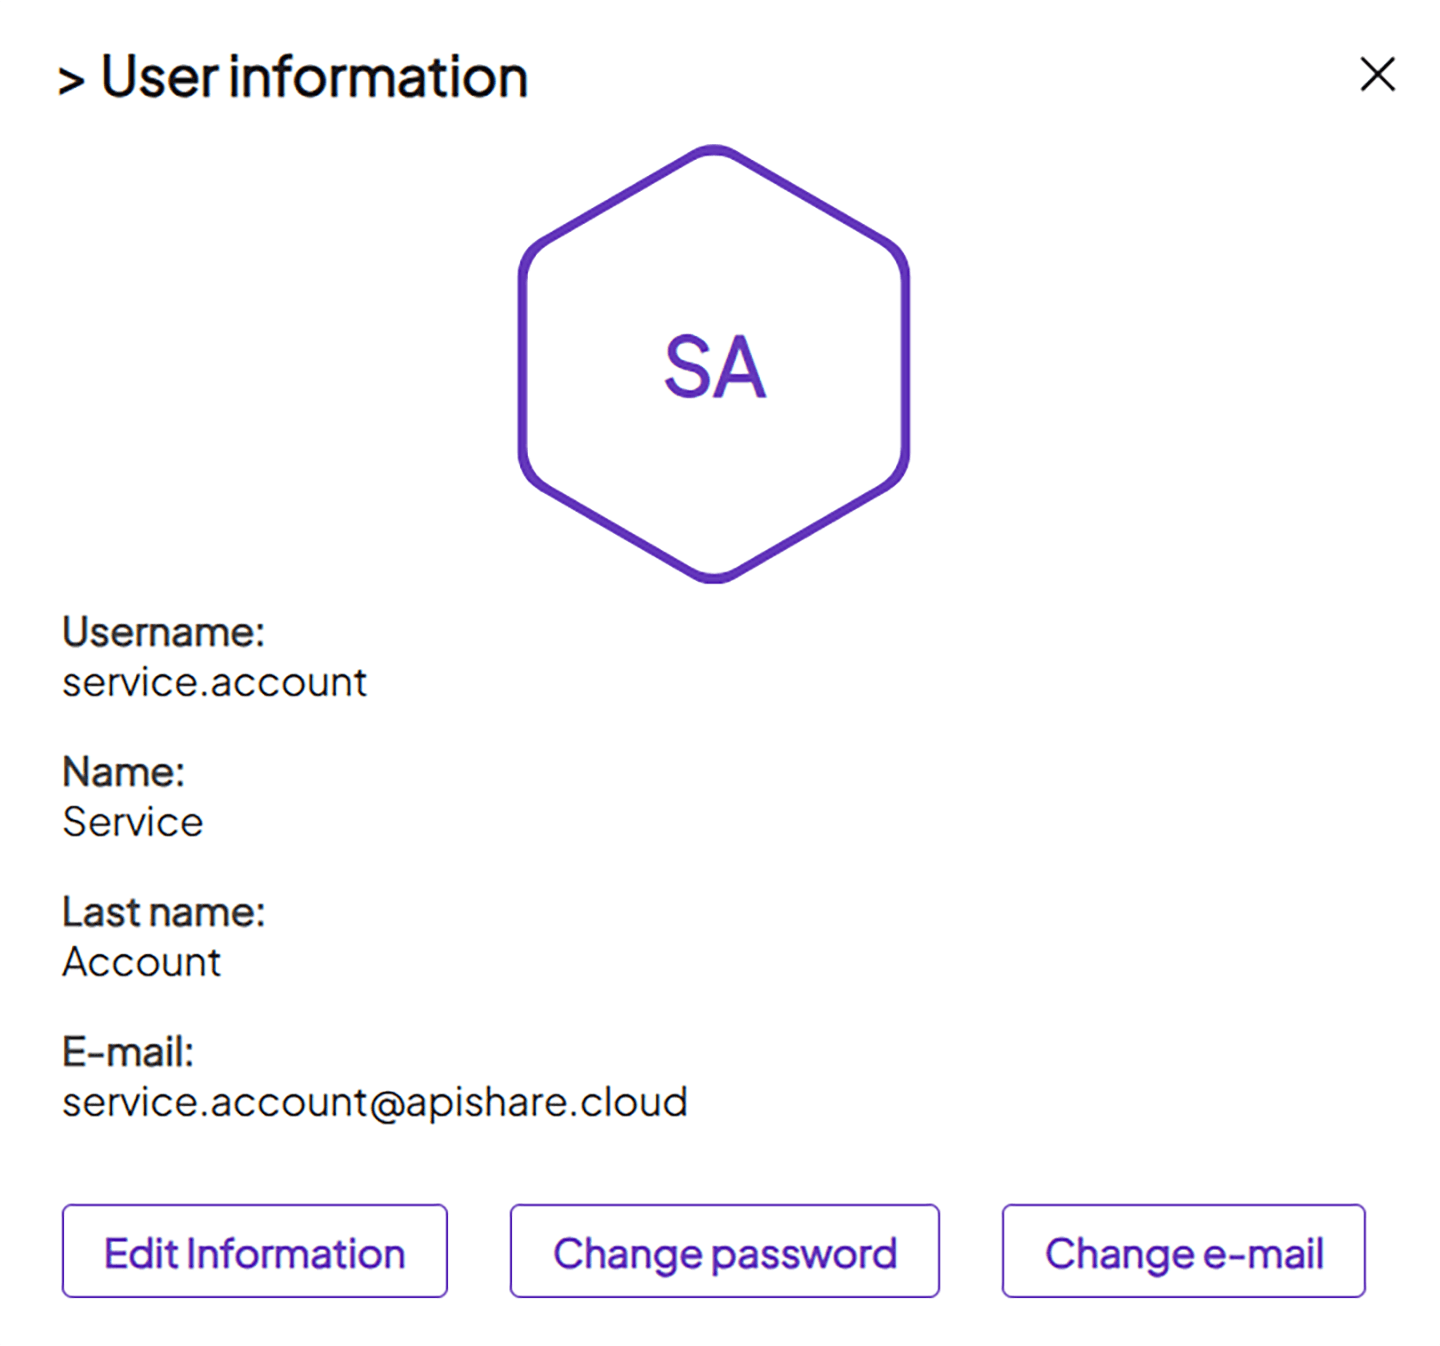
Ensure the user is profiled as owner (check user panel, hexagon icon top-right).
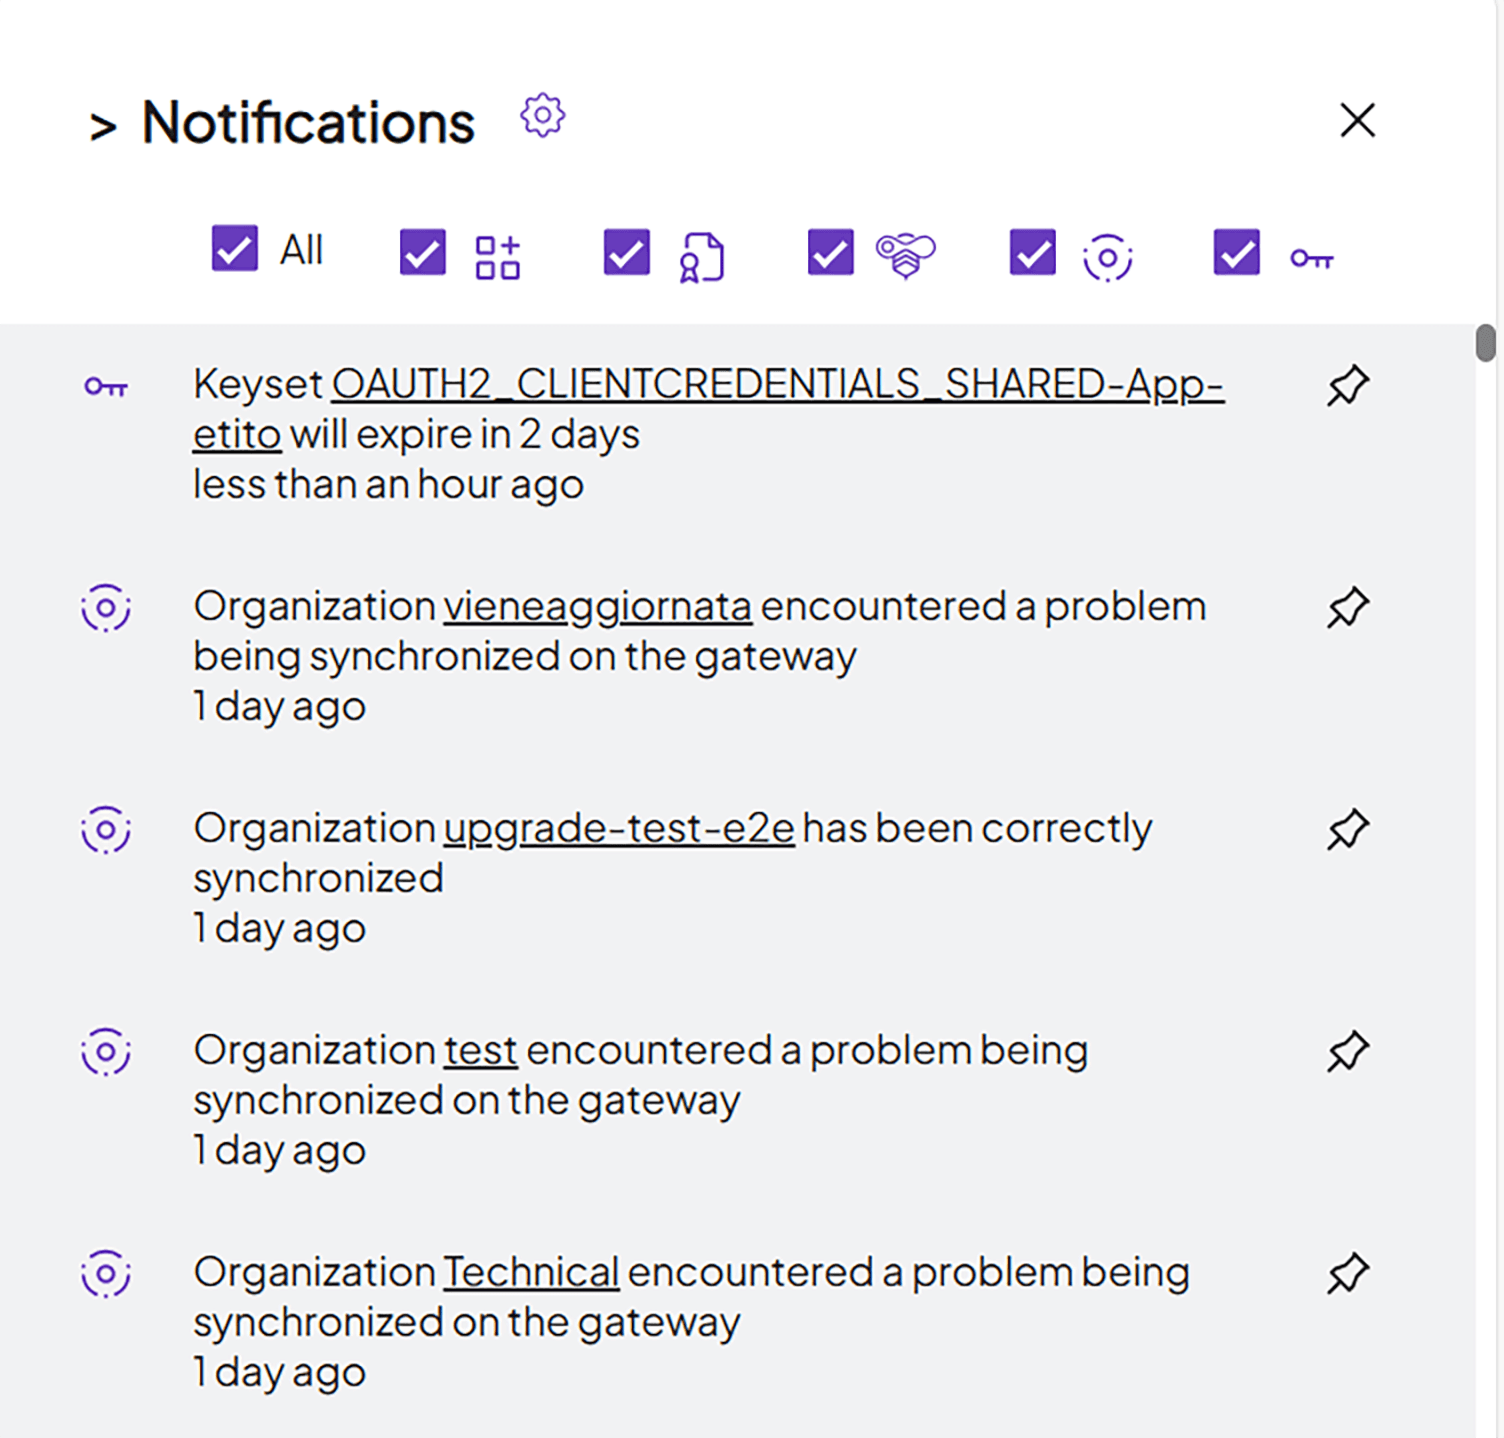
Open the notification panel (bell icon). Even if no notifications appear, absence of errors confirms that endpoints are responding.
Browse all sidebar sections and confirm error-free loading.
Closing Activities
Configuration Persistence
After completing the installation, it is highly recommended to persist the workspace in a distributed version control tool (e.g., Git repository). This repository will serve as the baseline for future updates.